Here is a quick Lasagna video! See next blog entry for recipe and finished photo!
Building
Baking
Monday, November 22, 2010
Monday, November 8, 2010
Basil Oil
Stephanie teaches us how to make Basil Oil.
1 1/2 cups of packed Basil leaves
2 cups Olive Oil
Salt & Pepper
We used the left over leaves to make pesto.
1 1/2 cups of packed Basil leaves
2 cups Olive Oil
Salt & Pepper
We used the left over leaves to make pesto.
Tuesday, October 19, 2010
A Fast and Delicious Spaghetti ( Video and Recipe)
When you come home and want something really delicious and quick here is the pasta for you!
All you need it garlic, olive oil, a fresh tomato, some fresh basil and some angel hair or spaghetti.
Here is how you do it for 1 serving dinner or 2 first course.
2-3 Tablespoons Olive Oil
3-4 med cloves of garlic sliced thin or chopped
1 ripe tomato cut in pieces
hot pepper seeds to taste
4 to 5 basil leaves
2 to 4 oz dry spaghetti or angel hair cooked al dente ( I like whole wheat)
Before you start your sauce, put your water on to boil for the spaghetti and salt it to taste.
Then, add your olive oil and garlic to a skillet and saute ( do not let brown), add hot pepper seeds to taste and then the pieces of tomato and once they soften, smash them with the back of a fork so as to incorporate into the olive oil. Season with salt and pepper. Once this is cooked and it doesn't take long you can turn the heat off while you're boiling your pasta.
When the pasta is done, fire up the skillet again ,add a little of the water from the pot to the skillet and then add the drained spaghetti and toss for a minute to coat it well. Top with your favorite cheese if you like and you have just added a new dish to your repetoire that is easy, economical and you will amaze yourself and your friends.
Cooks note: If you want to add some variety or don't like hot pepper seeds, try adding some sliced olives or a few capers in your sauce. If you like your sauce with more tomato, simply add more fresh tomato and season to taste. A drizzle of extra virgin olive oil on top makes it even better!
Tuesday, October 12, 2010
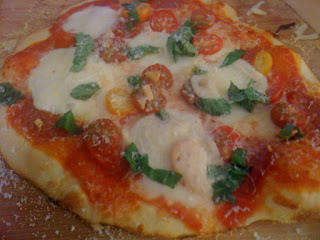
October is national pizza month.
So here is a pizza posting!
Stephanie made pizza with her mom and dad. Steph's parents are real pizza connoisseurs so this was a real test of how well we can make pizza and we passed the test!
Here is an email I received from Stephanie along with some pictures.
"These pizzas came out fabulously! We made two types: Pepperoni and Margherita
with mozzarella di buffala, basil and tomatos"


Monday, September 27, 2010
Lets Make Pesto!
Here is Stephanie's first video on our blog. She normally films our videos but she's such a good cook we had to get her in front of the camera!
4 cups of basil leaves
1 1/2 cups of olive oil
1 cup of pine nuts or walnuts
1 1/2 cup parmesan cheese
3 cloves of garlic
Salt & Pepper to taste
Use it on pasta or pizza. It's awesome on a turkey sandwich. I use it on toast instead of butter. We love tomato sandwiches and pesto makes them even better.
Sunday, September 26, 2010
Homemade "Brodo" Broth

There is nothing better than homemade broth, chicken or beef as it has so much flavor and is a great starter for soups and risotto. It can be frozen and kept on hand.
Basic Recipe for Broth
Whole chicken or chicken breasts ( to keep it lower in fat)
Water to cover your meats and veggies
Celrey 2 to 3 ribs cut into pieces
Carrot 1 or two cut into pieces
Tomato 1 or 2 fresh or a handful of whole canned tomato
Onion 1 large or 2 med sliced into med pieces Fresh herbs ( Italian Parsley, Thyme, basil )
Salt and pepper
Add all to a pot and bring to a boil. Simmer and cook for about 2 hours or so till meat is tender and falling apart.
 |
| Here's what the start of the soup looks like |
You can strain the soup when it's done and have a clear broth.
You can strain and remove the thyme stems and meats and then blend the cooked veggies into your broth.
If your broth looks like it has too much fat in it, then strain and put the broth into the fridge for a day and the fat will get hard and float to the top. You can then easily remove it.
 |
| Here I added some white beans to my soup |
 |
| After a couple of hours of simmering |
 |
| Chill strained broth to have the fat harden on top and be easy to remove |
 |
| You can keep a little for flavor |
 |
| Steam the greens first and then add to the cooked broth along with some of the cooking liquid |
You can also add some tortellini to the cooked broth and serve with grated cheese for a delicious starter. The possibilities are endless!
When I was little my mom used to ask what we wanted for our birthday dinner and I always wanted her chicken soup with rice.
Cooks note: You can use beef or chicken or a combination of anything you may have in your freezer. Bones give great flavor so make sure your meat has some bones.
Grilled pizza with the help of a Pizza Stone
.jpg) |
| Grilled Mushroom with Pesto Oil |
.jpg) |
Grilled pizza with peppers,onion, olive and fresh tomato plus pesto oil |
Cooks note: A Huge Metal Spatula is a tool you will want or a Pizza Peel to help moving the pizza around when you are doing this.
To finish it off, slide it over to the grill again till the cheese is all bubbly and hot and finish off with the pesto oil. Recipe to follow.
Pesto oil recipe
Fresh basil leaves
Fresh garlic
Olive oil and salt to taste
Just mix it all in a blender or mini chop type food processor and drizzle over your pizza when it comes off the grill.
.jpg) |
| A new cook in training~ |
Tuesday, September 14, 2010
Basil Harvest 2010
We picked (almost) all of our basil last weekend. We turned most of it into Pesto, I took video and I'll be posting it soon. We tried a couple different storeage methods that we will test in a few months. If everything works out, we'll be eating pesto all winter. I can't wait to make a pesto pizza!


Sunday, August 29, 2010
Meatballs 101
Basic Meatball Recipe
1 lb. Turkey Meat (or substitute lean meat)
1 egg
2/3 cup of bread crumbs (plain or seasoned)
2-4 cloves of garlic chopped fine
¼ cup to 1/3 cup of chopped flat leaf parsley (Italian Parsley)
Salt and pepper to taste (2 tsp salt and 1 tsp pepper approx)
1/3 to ½ cup of grated Romano cheese
Add all ingredients to a large bowl and mix but don’t overwork the mixture as it can make the meatballs less tender. I like to put a small amount of the mixture in the microwave for 1 minute or fry in olive oil to taste for seasonings at this point. Adjust if necessary.
cooks note: If it seems a bit dry, you can add a little milk to moisten the mixture.. but not too much. An alternative to the bread crumbs is just some sliced bread soaked in milk and then squeezed to get the excess milk out. Crumble into mixture in place of dried bread crumbs.
I like to scoop out with an ice cream scoop to keep them of equal size and then round them out in my hands. Makes about 15 or so.
You can either fry in a skillet with olive oil till browned or cook on a parchment lined cookie sheet for approx 30 minutes at 375 degrees till browned. Then drop them into the sauce so they absorb the wonderful tomato flavor. Don’t stir too much as the meatballs could break apart. Simmer on low heat for 20 minutes or so until they are done.
NOTE: This is a basic recipe. You can add lots of different things to this like hot pepper seeds, different meat combination, etc.
It's easy to double or triple this recipe for a crowd. You can keep the meatballs in cooked form (before adding them into the sauce) in the freezer if you want to prepare extra and have for another time.
Try them and you will never eat store bought meatballs again. They are just so much better made with love at home.
Tuesday, August 24, 2010


Friday, April 30, 2010
Friday, March 26, 2010
So many pizzas.
If you need some ideas for pizza toppings or if you just like to look at pizza, check out this huge collection of pizza pictures.
Sunday, March 21, 2010
Some friends came from Arizona last week...


They spent their days at the beach so that must have made them extra hungry!They had sausage, mushroom and garlic.. Ours had yellow bell pepper, onions, garlic, sausage and mushroom with fresh basil... (sometimes I think my friends think I'm going to make them a pizza like they get at take out, they are always shocked at how delicious it is)
Saturday, March 6, 2010
Making friends with pizza
There are a few pizza blogs out there but one of the best is pizzatherapy.blogspot.com. We sent him an email to introduce ourselves and Albert Grande, the creator, couldn't have been nicer. This guy loves pizza more than anyone I know. He's on a mission: Making good food is more than just about eating. We're glad to be part of this mission.
Wednesday, March 3, 2010
Our first fan pizza!
A good friend of mine made pizza today. They look really good. Nice job! It's really fun knowing that people are making pizza from our videos. Keep sending us photos and posting on our blog!

She wrote:

She wrote:
"One is onion, spinach, garlic and mushroom and the other is plain cheese for the kids. I don't have a board or a stone, but even on a lousy baking pan it is So Delicious. Thank you guys!"
Monday, March 1, 2010
Caramelizing Onions
.jpg)
.jpg)
.jpg)
.jpg)
.jpg)
One of every one's favorite pizzas is the ricotta cheese topped with caramelized onions. I start with a few types of onions, yellow, sweet and red. You can add what you like or do whatever suits you. Just start with 8 to 12 onions, depending on size and slice them thin. You can use a mandolin if you have one, or a very sharp knife does the job very well.
Then get a large skillet and add some olive oil and butter. I never really measure but it would be about half a stick of butter and a few Tablespoons of olive oil.
Add the onions and start over high heat but bring it down as they start to cook and keep moving them every 5 minutes or so. I eventually end up at a low flame so as not to burn the onions but to gently caramelize them. Add salt and pepper. Add some wine if you like, or balsamic vinegar if that sounds good. Make them your own! It takes about an hour to do them properly and you don't want to burn them. I have some photos here to show the different stages.
You can do these ahead of time, and then lift them out and spread over the pizza with 2 forks. This is a great appetizer cut in squares and reminds me of a calzone.
A new Pizza
.jpg)
.jpg)
This is a new pizza I tried out the other night. I used my wheat crust, added my usual fresh garlic and sliced onions, some mozzerella cheese, fresh mushrooms and then my roasted sweet tomatoes ( roast in oven with garlic and olive oil, plenty of salt and pepper) I loved that the crust shape looked like a heart and then I topped it off with goat cheese and after baking some freshly chopped basil. Add some hot pepper seeds if you like it spicy like I do and it was so good! My friends that were over loved it! It was our 6th pizza.. but there was plenty to take home for all!
Do you have a favorite pizza or idea that you would like to share? Let us know about it. It may show up on this blog!
Tuesday, February 23, 2010
Buy your pizza making tools here.
These 2 items are the only ones you really need to produce a great pizza. The stone turns your oven into something very close to a pizza oven.
The peel allows you to build your pizza on it, and then slide it onto the hot preheated stone in the oven and also to take it out of the oven. These items can be hard to find unless you have a great cooking store nearby so check them out. They are priced well and essential to great pizza making.
The peel allows you to build your pizza on it, and then slide it onto the hot preheated stone in the oven and also to take it out of the oven. These items can be hard to find unless you have a great cooking store nearby so check them out. They are priced well and essential to great pizza making.
Friday, February 19, 2010


Sunday, February 14, 2010
Cooking Times and Temperatures
I like to put my stone in the oven and preheat to 475 degrees. I usually would like the oven on for at least half an hour at that temp before baking. My cooking time can be anywhere from 9 to 14 minutes at this temp with the stone. It is great to have a large long spatula to lift the pizza up and check the bottom for color. You want it browned but not burnt. If you have just bought your pizza stone then keep it in the oven even when you are not using it and let it get dark. The darker, the better and don't wash it with soap. If you get burnt cheese or things on it, use your spatula or dough scraper to get that stuff off. A well seasoned stone makes a really great pizza! I think Drew and Stephanie use 500 degrees to do theirs but as I mentioned, it really depends on your oven. Do what works for you.
Saturday, February 13, 2010

Friday, February 12, 2010


How to make homemade Pizza. Part 3.
Here is part three to our homemade pizza video. We finally get to eat our pizza!
How to make homemade Pizza. Part 2.
Here is part two to our homemade pizza video. This video shows how to top and bake a pizza.
How to make homemade Pizza. Part 1.
Here is part one to our homemade pizza video. This video shows how to make pizza dough with a mixer and by hand.
Thursday, February 11, 2010
Pizza Dough Recipe
For 2 large thin pizzas
3 Cups White Flour ( or 1.5 cup white and 1.5 cup wheat flour)
2 T. Olive Oil
1 T. Sea Salt
1 Cup warm water ( should feel warm, not hot on your wrist)
1 package of dry yeast or 2 teaspoons dry yeast. (Drew's prefers the cut the yeast in half for less of a yeast flavor.)
1/2 teaspoon sugar
Mix yeast and sugar into warm water. Let it sit for 5 minutes or so till it starts to foam.
Add flour, olive oil and salt into large mixing bowl or Cuisinart or processor.
Hand method: Add water slowly into your flour mixture and mix till dough ball forms. Knead by hand for 3 to 5 minutes till dough feels firm and not too sticky. Add more flour if too sticky, more water if too dry.
Put in a bowl to rest and rise for approx 1 hour. Cover with cloth or plastic wrap in a warm spot.
Cuisinart method: Add flour, salt and oil and pulse the mixture with dough hook attachment.
Add water slowly with while mixing and wait for dough to form a ball. Again this can take a little more water or flour depending on the weather and moisture in the air. Continue to mix for about 1 minute or so, then put on board and knead for a bit till elastic and smooth. Let rest covered in a warm spot till doubled in size.
Once dough has doubled, you are ready to cut in half and start your pizzas!
Wednesday, February 10, 2010
Pizza Making Videos
Drew and I are excited to post our first Pizza making video. Drew has been making dough for awhile now but mostly baking it in the form of a foccacia, so while visiting them in Boulder over the New Year holiday, we made pizza! I hope you learn something from these videos and we welcome your questions and comments. Once you master the techniques which are all pretty simple, you will not want to buy pizza anymore. It's so much better at home.
Theresa
Theresa
Tuesday, February 9, 2010
Subscribe to:
Posts (Atom)